Head to OpenGL: Hello Triangle
Sep 03, 2012Preface
I’ve been struggling to find some tutorials to learn modern OpenGL. By modern, I mean programmable pipeline introduced in OpenGL 3.0, not the deprecated fixed pipeline prior to OpenGL 2.x.
I found the most famous OpenGL tutorials are NeHe’s, It’s too deprecated to learn from them. Also the ‘official red book’ is sticking with the old API, while annoucing to support OpenGL 3.0.
Now OpenGL 4.3 has been released, why those tutorials are still in 2.x age? The only available resource I found is Learning Modern 3D Graphics Programming, I have to admit it’s a great book.
The OpenGL Super Bible targets to OpenGL 3.x, but I don’t like the manners it teaches, all details are hidden until the end of the book. After reading through the book for many pages, I found I still can’t write a simple triangle programme with public general API, so frustrated.
Anyway, I will try to write my own OpenGL tutorials, I’m a beginner, so I know how to learn as a beginner. Stop talking, show me the Hello world!
System requirements
I use Ubuntu 12.04 installed on a MacBookPro8-1 as my development OS, I choose CMake as the building tool, freeglut to manage window and OpenGL context.
Git is used along all my coding process, it’s recommended to use it but not required.
If you’re a beginner, you may not understand what’s OpenGL context, I don’t either think I can explain it clear to you at the very beginning. For now, you just need to remember that it’s the window OpenGL will rendering it’s content to, e.g. you should create a window to draw something. Freeglut is here to do the window initialization, and it’s a defacto window manager for OpenGL in Linux.
sudo apt-get install freeglut3-dev cmake git
After you succeed to issue the command above, we can proceed to the exciting code.
Setup a skeleton
As an OpenGL newbie, I’m also a cmake beginner. But I can generate the most simple working cmake structure for all the OpenGL tutorials I will write.
├── build
├── CMakeLists.txt
└── main.c
You can use any approach to create above file structures, I choose to issue commands below:
mkdir build
touch CMakeLists.txt main.c
After that, add these contents to the only CMakeLists.txt file:
CMAKE_MINIMUM_REQUIRED(VERSION 2.8)
PROJECT(NEWBIE)

ADD_DEFINITIONS(-std=c99 -O3 -funsigned-char -freg-struct-return
    -Wall -W -Wshadow -Wstrict-prototypes -Wpointer-arith -Winline)

FIND_PACKAGE(GLUT)
FIND_PACKAGE(OpenGL)
SET(GL_LIBS ${GLUT_LIBRARY} ${OPENGL_LIBRARY})

SET(SRC main.c)
ADD_EXECUTABLE(main ${SRC})
TARGET_LINK_LIBRARIES(main ${GL_LIBS} m)
Now enter the build directory, and run command cmake .. to test if your environment works. A working runtime will produce a final output similliar to:
Build files have been written to: /home/ren/Code/HeadToOpenGL/build
If everything OK, we can step to create the window. If not, you can contact me to help you, but I’m not an expert too. Why do I choose cmake? Because I haven’t used it before, so I wanna learn it by the way.
Hello window
Finally, the exciting part comes. Write your main.c as the following code:
#include <errno.h>
#include <math.h>
#include <stdio.h>
#include <string.h>
#include <GL/gl.h>
#include <GL/glu.h>
#include <GL/glut.h>

int main(int argc, char *argv[])
{
  glutInit(&argc, argv);
  glutInitDisplayMode(GLUT_DOUBLE | GLUT_ALPHA | GLUT_DEPTH | GLUT_STENCIL);
  glutInitWindowSize(800, 600);
  glutInitWindowPosition(200, 100);
  glutCreateWindow(argv[0]);

  glutMainLoop();
  return 0;
}
Then go to build directory and test the most simple blank window:
make && ./main
If you can see a blank transparent window, then congratulations!
Hello triangle
As you can see, it’s very easy to create a window, but to create a triangle is a little hard. So I will list the full code of main.c at first, you can just copy all the code to your main.c in above cmake structure.
#define GL_GLEXT_PROTOTYPES
#include <error.h>
#include <stdio.h>
#include <math.h>
#include <GL/gl.h>
#include <GL/glu.h>
#include <GL/glut.h>

#define CHECK_GL_STATUS(T,O,S) { \
  GLint status; \
  glGet##T##iv(O, S, &status); \
  if (GL_FALSE == status) { \
    GLint logLength; \
    glGet##T##iv(O, GL_INFO_LOG_LENGTH, &logLength); \
    char *infoLog = malloc(logLength * sizeof(char)); \
    glGet##T##InfoLog(O, logLength, NULL, infoLog); \
    fprintf(stderr, "%d: %d, %s\n", __LINE__, S, infoLog); \
    free(infoLog); \
  } \
}

#define VERTEX_SHADER " \
  #version 130\n \
  in vec4 position; \
  in vec4 color; \
  smooth out vec4 vColor; \
  void main() { \
  gl_Position = position; \
  	vColor = color; \
  }"

#define FRAGMENT_SHADER " \
  #version 130\n \
  smooth in vec4 vColor; \
  void main() { \
    gl_FragColor = vColor; \
  }"

const GLfloat sValues[] = {
  0.0f, 0.5f, 0.0f, 1.0f,
  -0.5f, -0.5f, 0.0f, 1.0f,
  0.5f, -0.5f, 0.0f, 1.0f,
  1.0f, 0.0f, 0.0f, 1.0f,
  0.0f, 1.0f, 0.0f, 1.0f,
  0.0f, 0.0f, 1.0f, 1.0f,
};

static GLuint sProgram;
static GLuint sLocPosition;
static GLuint sLocColor;
static GLuint sValuesBuffer;

GLuint CreateShader(GLenum shaderType, const char* shaderSource)
{
  GLuint shader = glCreateShader(shaderType);
  glShaderSource(shader, 1, (const GLchar **)&shaderSource, NULL);
  glCompileShader(shader);

  CHECK_GL_STATUS(Shader, shader, GL_COMPILE_STATUS);

  return shader;
}

GLuint CreateProgram(GLuint vertexShader, GLuint fragmentShader)
{
  GLuint program = glCreateProgram();
  glAttachShader(program, vertexShader);
  glAttachShader(program, fragmentShader);
  glLinkProgram(program);

  CHECK_GL_STATUS(Program, program, GL_LINK_STATUS);

  return program;
}

void Init(void)
{
  GLuint vertexShader = CreateShader(GL_VERTEX_SHADER, VERTEX_SHADER);
  GLuint fragmentShader = CreateShader(GL_FRAGMENT_SHADER, FRAGMENT_SHADER);
  sProgram = CreateProgram(vertexShader, fragmentShader);

  sLocPosition = glGetAttribLocation(sProgram, "position");
  sLocColor = glGetAttribLocation(sProgram, "color");

  glGenBuffers(1, &sValuesBuffer);
  glBindBuffer(GL_ARRAY_BUFFER, sValuesBuffer);
  glBufferData(GL_ARRAY_BUFFER, sizeof(sValues), sValues, GL_STATIC_DRAW);
  glBindBuffer(GL_ARRAY_BUFFER, 0);
}

void GLUT_display(void)
{
  glClearColor(1.0f, 1.0f, 1.0f, 1.0f);
  glClear(GL_COLOR_BUFFER_BIT);

  glUseProgram(sProgram);

  glBindBuffer(GL_ARRAY_BUFFER, sValuesBuffer);
  glEnableVertexAttribArray(sLocPosition);
  glVertexAttribPointer(sLocPosition, 4, GL_FLOAT, GL_FALSE, 0, 0);
  glEnableVertexAttribArray(sLocColor);
  glVertexAttribPointer(sLocColor, 4, GL_FLOAT, GL_FALSE, 0, (void *)48);

  glDrawArrays(GL_TRIANGLES, 0, 3);

  for (GLenum err = glGetError(); err != GL_NO_ERROR; err = glGetError()) {
    fprintf(stderr, "%d: %s\n", err, gluErrorString(err));
  }

  glDisableVertexAttribArray(sLocPosition);
  glDisableVertexAttribArray(sLocColor);
  glBindBuffer(GL_ARRAY_BUFFER, 0);
  glUseProgram(0);

  glutSwapBuffers();
}

void GLUT_reshape(int w, int h)
{
  glViewport(0, 0, w, h);
}

int main(int argc, char *argv[])
{
  glutInit(&argc, argv);
  glutInitDisplayMode(GLUT_DOUBLE | GLUT_ALPHA | GLUT_DEPTH | GLUT_STENCIL);
  glutInitWindowSize(800, 600);
  glutInitWindowPosition(200, 100);
  glutCreateWindow(argv[0]);

  glutDisplayFunc(GLUT_display);
  glutReshapeFunc(GLUT_reshape);
  Init();
  glutMainLoop();
  return 0;
}
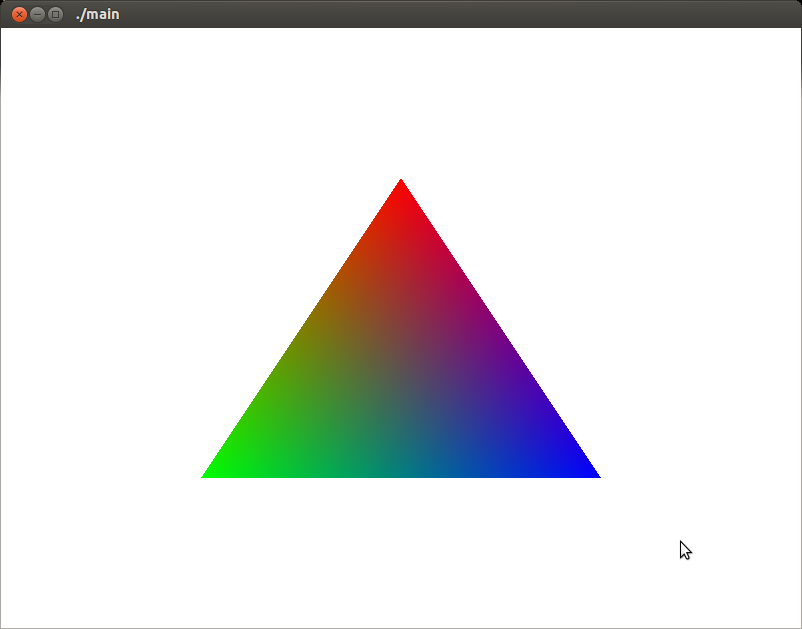
OK, just type make && ./main in your build directory, then you will see a colorful triangle like below:

Conclusion
I will try my best to explain how does the triangle come to your screen in the next tutorial. At this point, please make sure you can say hello to triangle.